Categories
faq howto support

Reporting problems

I just found this review in the US App Store:

A couple of things about this.

Firstly, if you experience problems with Yummy, please let me know. If I don’t know about an issue I can’t fix it. Leaving a review doesn’t work terribly well, either, as there is no way for me to respond. There is a support link in iTunes, here on this web site and in the “About” screen of the application itself.

But what about this reported issue? I can’t be sure but I think that this user signed into Yummy using their Yahoo! ID but all their bookmarks are in an account protected by a normal Delicious.com password. Normally this should give an error message, however if you sign into an account with no bookmarks then it will probably appear to “hang.” (This is a bug and I’ll try to fix in a subsequent version. Obviously this doesn’t affect most users.)

On the other hand, if there is genuinely a “timed out” error message then it’s down to either the network or at the Delicous.com end. These are not components that I have any control over I’m afraid, so all I can suggest is that you try using a WiFi connection rather than 3G. I do all of my testing on a first generation iPhone, which has a 2G data connection and less memory than most newer handsets so I know for sure that Yummy works even on a slow network!

In general, if you’re not sure which authentication method to use I would suggest you try Delicious.com first as it’s much less hassle if it’s not the right one.

Categories
faq howto support

Yummy 2.4 new feature: Post to Facebook

Yummy has been able to share your bookmarks in various ways since version 1.0. Yummy 2.4 adds a new way: share with your Facebook contacts.


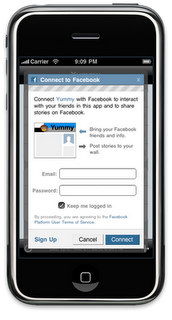
First you have to log in. You should be able to find this without too much trouble: it’s right on the main menu screen, just above the “Log out from Delicious.com” option. When you select the menu item you should get a screen that looks like this:

As the text suggests, just enter your Facebook login credentials. Yummy will remember them for future reference.

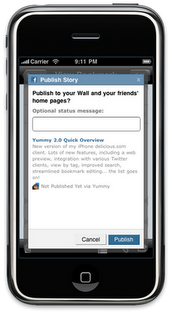
And then next time you’re looking at a bookmark that you want to share, simply press the “link” icon and select “Send to Facebook” option. You’ll then get a screen like the above, which shows a simulation of what the link will look like. Enter a status message if you like and press “Publish” when you like what you see.
Categories
faq howto support

Yummy 2.4 new feature: View Tag Bundles

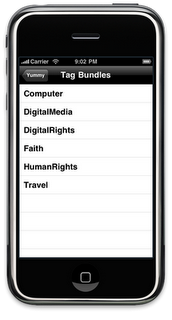
An entirely new feature that you should easily be able to find in the main menu is the ability to view your Tag Bundles.

A Tag Bundle is a collection of tags, and drilling down shows a list of all the bookmarks that have any of the tags in it. If you have a lot of tags in one bundle or many tags in total it may take a second or two to produce the list but it will work eventually.

Categories
faq howto support

Yummy 2.4 new feature: Enhanced Tag Editing

Like the Web Preview screen that I talked about yesterday, the Tag Editing screen is one that has existed for a while but sees a significant update in version 2.4.

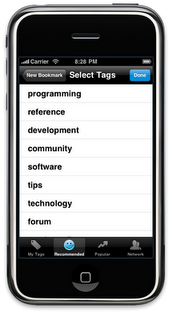
Rather than just allowing you to select from your own tags, Yummy now goes back to Delicious.com and asks for recommended and popular tags for the link in question.

As you an see in the screen shot, it also shows your network, allowing you to share your bookmarks with other Delicious users.

Categories
faq howto support

Yummy 2.4 new feature: Post to Twitter

I can tell what you’re thinking. Yes, Yummy has been able to send links to Twitter for over a year. Since version 2.0 the “Send to Twitter” button has closed down Yummy and opened one of a long list of Twitter clients.

While that option is still present, Yummy 2.4 includes a much better option: a built-in Twitter client. If you’re just sharing a link it means that you don’t have to exit Yummy which makes the whole process that little bit quicker and more convenient.

So how do you get it?

Easy.

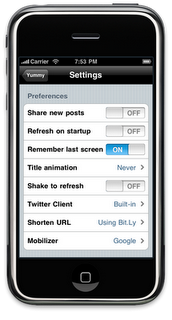
First go to the Settings screen, either the one from the main menu or the one in the Settings app:

Change the Twitter Client option to “Built-in.” It’s the first option after “None.”

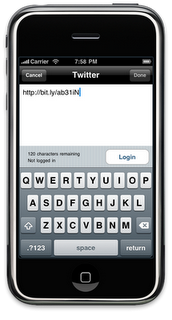
Next go to a link that you want to send to Twitter and press the “Link” icon in the toolbar.  Press the “Send to Twitter” button.

Now comes the slightly annoying bit.

Press the “Login” button. Yummy will now (after a prompt) quit and take you over to Safari. Here you should log into Twitter as instructed and copy the PIN code to the clipboard.

(The irony of having a system to avoid having to exit an application requiring the user to exit when setting it up is not lost on me. I’m hoping to improve this in a subsequent version.)

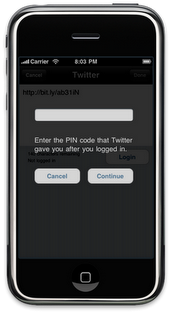
On relaunching Yummy you should see the following screen:

Do as instructed and you’re ready to go. Yummy will have remembered your link (so you can publish straight away). You only need to go through this Yummy-Safari-Yummy trip once.

Categories
faq support

Yahoo! ID FAQ

So I can log in now using my Yahoo! ID?


You log into Yummy using the same process you use to log into the Delicious.com website. If you have one of the original accounts — and the vast majority of people do — you need to log in using your username and password as before. If you have a new account, most likely one opened since October, then you probably have a Yahoo! ID and should use the new scheme.

I’m afraid that your Delicious username and your Yahoo! ID are not interchangeable. Only one will actually let you into your account; the other will say that your credentials are incorrect. Unfortunately without (potentially) asking you to enter your details more than once it’s not possible for Yummy to figure out which scheme you use. This is a limitation imposed by Yahoo! I’m open to ideas of how to make it simpler.

I have the option to migrate my Delicious.com account from using a username and password to using a Yahoo! ID. Should I make the change?
Yummy should work with the new scheme without any problems. However there are still a few reasons that you might want to stay with the “old” authentication scheme.
First, not all Delicious.com clients work with Yahoo! ID yet. If you use a desktop client as well as Yummy you’ll need to make sure it works too.
Also, if you have multiple accounts and switch between them you might want to think about how you migrate them. Do you need multiple Yahoo! accounts?
Having said that, it’s clear that Yahoo! plan on migrating all users sooner or later.

The login process takes you out of Yummy and into Safari. Why not just use a built-in web view?

The first point to make is that you only need to do this once, so, while it is a bit of a hassle, it’s not something you need to do very often.

As for why, the weak reason is that this is what Yahoo! recommends.

The real reason is that it’s all about trust. If Yummy brings up a web view you then have no idea what it’s doing in the background. If, on the other hand, it sends you to Safari, an application that you know and trust, then the idea is that your credentials are in much safer hands.

You could argue that you already had to trust Yummy. However, this time you’re entering your Yahoo! ID which also gives access to your Mail, Flickr and the many other services that Yahoo! provide. The Yahoo! ID mechanism only gives Yummy permission to access the resource you tell it to. I can tell you that I’m not using your password for nefarious means and you can just trust me, or you can just not give me the details in the first place.

When I log in using a Yahoo! ID it seems a bit slower than before.

Approximately once an hour Yummy has to go back to Yahoo! and ask to be authorised again. This is all automated and behind the scenes; there is no need to enter your password again. This means that your initial refresh may take a little longer than before but everything else should be about the same or quicker.

I’ve changed my Yahoo! password. Where do I make the change in Yummy?

One of the nice things about the new method of logging in is that Yummy no longer has a copy of your password and so it never needs updating, even if you change it.

How do I stop Yummy accessing my Delicous.com account?

You can log out of your account by pressing the new “Logout” option in the main menu of Yummy.

You can also “force” the issue by withdrawing permission from the Yahoo! website. When you first connect Yummy to Delicious.com you’ll get an email with instructions and a link that explain how to do this. (The link provides a unique reference so I can’t include it here.)


If you have any other questions, please ask in the comments below.

Categories
faq howto trivia

Spot the Difference

One question that I realised that I have not answered very clearly yet is, What’s the difference between Yummy and Yummy Browser? That’s what I hope to answer here.

Perhaps obvious, but worth repeating anyway, is that Yummy Browser is the “lite” version of Yummy. The practical upshot being that every feature in Yummy Browser is also in Yummy.

The name indicates the main difference between the two versions. Yummy Browser allows you to browse your Delicious.com bookmarks. That is, you can:

  • View your bookmarks by date
  • View your bookmarks by tag

You can also view all your meta-data, including the notes field, the date added and the public/private status. Of course there’s no point in just viewing them, so you can also open bookmarks in Safari or send them to Mail so you can send them to your friends.

Yummy Browser is built from exactly the same code as the full version and is, similarly, capable of handling thousands of bookmarks.

The full version of Yummy has a number of great extra features which can be summarised as follows:

  • Full editing support. You can add, edit and delete bookmarks directly on your iPhone
  • Search for bookmarks by tag(s) or keywords in the title or notes fields
  • Built-in web preview so you don’t need to switch over to Safari
  • Send bookmarks to Twitter

If you’re a heavy user of Delicious on the move, I think you’ll agree that these extra features are well worth getting. And it’s always nice to know that you can get a feel for Yummy for free.

Categories
faq howto support

Editing Tags

One of the constant battles you come across when developing an iPhone application is that between limited screen space and the desire to make new features obvious and easy to find. The ability to edit tags is clearly an area where I saved screen real-estate at the expense of making it discoverable.

I refer here to a suggestion added on the Yummy Uservoice page:

The other suggestion of auto fill all tags from a bookmark that others have added would be good too, although that would require a network lookup.

Actually this feature has been present since version 2.1! I consider it a failing on my part that users who are enthusiastic enough to send me feedback have been unable to find this feature themselves. I hope to make this easier to find and use in the next version.

But until the next release is available in iTunes the current mechanism is the only way to go. Here’s how it works.

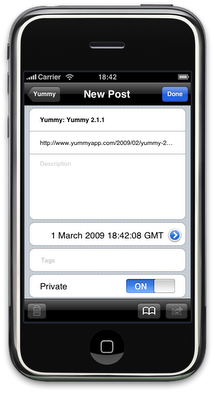
First, open the bookmark screen. You need to be adding or editing a bookmark for the button to be enabled. In this screen shot I am adding a new bookmark. Note that the “bookmark” icon at the bottom of the screen is now enabled.

Press this and the Tags field will now be populated with the suggested tags for this bookmark. If you’ve already added some tags then the new ones will be merged, so don’t worry, you won’t lose any edits.

If you followed the link to look at the suggestion, you’ll see that the quote above was the second part. Here’s the first half:

As you are entering new tags, auto lookup of tags I’ve used before. Say I have already used the tag “iPod-touch”, as I type “ip…” it would display all tags starting with “ip”.

I would love to be able to do this. There are, however, two stumbling blocks. The first is entirely my problem: performance. Some users have thousands of tags and making this work without being painfully slow would be hard. But the main difficulty is with the user interface.

Look at the screen above. Where could you put those suggested tags? When you remember that I also need to leave space for the keyboard, there really isn’t very much space! In the olden days, back in release 1.0 of Yummy, you used to edit tags on a different screen. This would have given enough space to add a list of suggestions, but a few users complained that moving to a new screen was unnecessary and slowed things down. I agreed with this (even though that’s how Apple’s Contacts application works) and fixed it in version 2.0.

This is all to say that this is a feature that I am actively thinking about but is not one that you should expect to see imminently. If you have any suggestions of how you think this could be made to work, then I’m all ears.

Categories
faq howto support tutorial

Memory Warning

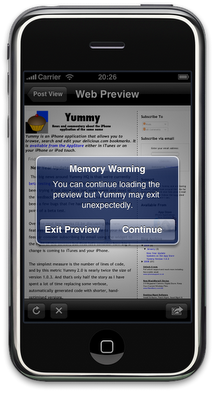
By now many of you (assuming you own Yummy!) will have seen the above warning message. Why are you getting it and what does it really mean? That’s what this post hopes to answer.

The first thing to note is that the error message is being completely honest. The iPhone has told Yummy that it is running out of memory and that if nothing changes it will be shutdown without warning.

Does that not mean that Yummy is being incredibly wasteful? How could it possibly be using 8Gb of memory just to display a webpage? The answer to that is, it’s not that memory that is being depleted. In order to run programs the iPhone has around 128Mb of memory, less than 30Mb of which is available to third-party applications like Yummy. The number on the box, the 8Gb, 16Gb and 32Gb sizes, are a different “pot” that cannot be used for the same purpose.

So, the first thing that Yummy does when it starts running out of memory is to “forget” about as much stuff as possible that it doesn’t currently need. This means that the number of bookmarks in your Delicious account has little bearing on how much memory is used.

Jettisoning this temporary data is typically enough to allow the webpage to load. However if you’re loading a particularly large or complicated page it might not be and, unfortunately, Yummy often does not get a second warning before being forced out.

This is one of those rare cases where I’ve had to let some of the underlying technical details show through. It’s not ideal but I thought it better that you know what’s going on rather than just allow it to exit without warning.

Categories
faq howto tutorial

Sending bookmarks to Twitter

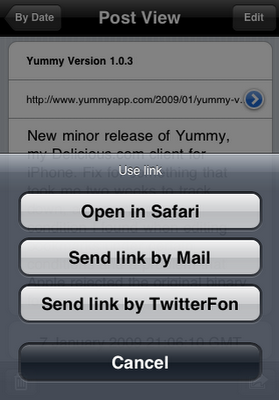
The funny thing about sending bookmarks from Delicious to Twitter is that I did this entirely for myself. I never saw any demand for it until after I’d added it! Now I see lots of people wanting to do exactly that and it was a popular feature with beta testers. So here’s what it looks like:

It’s simply a matter of selecting the option from the “action” menu found in both the bookmark view and and web preview screens.

This is a screen-shot from my phone and hence shows my current favourite Twitter client, TwitterFon. If you prefer Twitterrific or Tweetie, though, you’re also in luck.

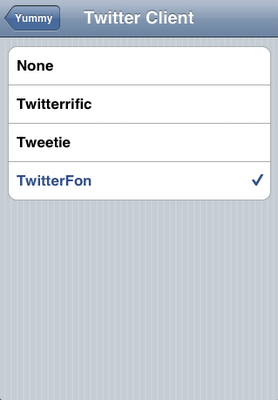
First go to the setting screen:

And then select the program you want to use for posting to Twitter:

Just below the “Twitter Client” setting is one called “Shorten URL.” This allows you to shorten the URL using is.gd before sending to Twitter.