Categories
faq howto support

Yummy 2.4 new feature: Enhanced Tag Editing

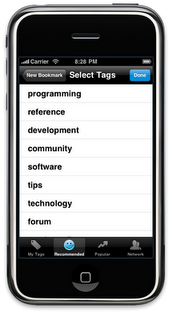
Like the Web Preview screen that I talked about yesterday, the Tag Editing screen is one that has existed for a while but sees a significant update in version 2.4.

Rather than just allowing you to select from your own tags, Yummy now goes back to Delicious.com and asks for recommended and popular tags for the link in question.

As you an see in the screen shot, it also shows your network, allowing you to share your bookmarks with other Delicious users.

Categories
howto support

Yummy 2.4 new feature: Enhanced Web View

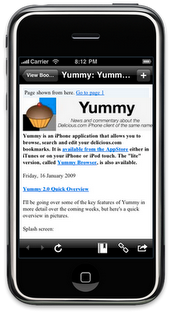
Yummy has had a built-in web preview feature since version 2.0, but version 2.4 brings a number of nice improvements.

Most obviously is the new array of buttons at the bottom of the screen. I’m sure you can guess the back, forward and stop/reload buttons.

The buttons on the right of the screen can also be accessed in the bookmark view and they are, left to right:

  • Send to read later service Instapaper or Read It Later. This button only appears if you have entered your username into the Settings screen.
  • Share link. Here you can share the current link on Facebook or Twitter.
  • Apple calls this an “Action” button, and in Yummy it allows you to send the link by email, open in Safari or copy the link to the clipboard.

More hidden, but possibly even more useful, is the support for Mobilizers.

A mobilizer is a service that transforms other websites, making them easier to view on the small screen found on handsets like the iPhone. If you go into the Settings you switch between “None” (the default), Instapaper and Google. The screenshot above has been converted by Google’s service.

Categories
faq howto support

Yummy 2.4 new feature: Post to Twitter

I can tell what you’re thinking. Yes, Yummy has been able to send links to Twitter for over a year. Since version 2.0 the “Send to Twitter” button has closed down Yummy and opened one of a long list of Twitter clients.

While that option is still present, Yummy 2.4 includes a much better option: a built-in Twitter client. If you’re just sharing a link it means that you don’t have to exit Yummy which makes the whole process that little bit quicker and more convenient.

So how do you get it?

Easy.

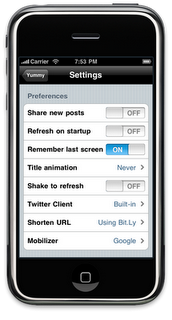
First go to the Settings screen, either the one from the main menu or the one in the Settings app:

Change the Twitter Client option to “Built-in.” It’s the first option after “None.”

Next go to a link that you want to send to Twitter and press the “Link” icon in the toolbar.  Press the “Send to Twitter” button.

Now comes the slightly annoying bit.

Press the “Login” button. Yummy will now (after a prompt) quit and take you over to Safari. Here you should log into Twitter as instructed and copy the PIN code to the clipboard.

(The irony of having a system to avoid having to exit an application requiring the user to exit when setting it up is not lost on me. I’m hoping to improve this in a subsequent version.)

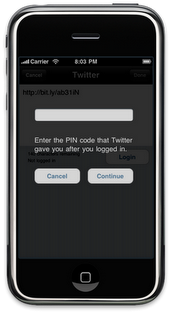
On relaunching Yummy you should see the following screen:

Do as instructed and you’re ready to go. Yummy will have remembered your link (so you can publish straight away). You only need to go through this Yummy-Safari-Yummy trip once.

Categories
howto support tutorial

Stuck at “Refresh” when logging in?

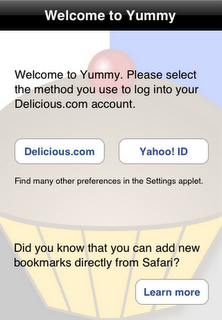
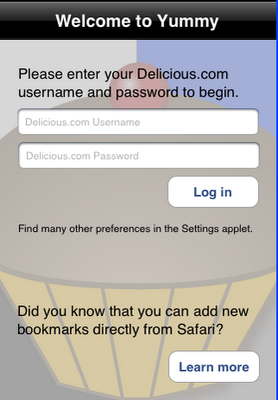
One question that puzzles some new users is, well, the first question that Yummy asks when you launch it, namely: should I log in using my Delicious.com account or my Yahoo! ID?

May be it could have been clearer, but you should only select the Yahoo! ID option if you’ve linked your Yahoo! ID with your Delicious.com account. This will be the case if either you’ve made the link yourself or you’ve opened an account in the last few months.


If you say you have a Delicious.com account when you have a Yahoo! ID, you’ll get a message saying that your username and password was not valid.

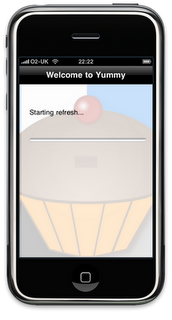
If, on the other hand, you say you have a Yahoo! ID but your account is still accessed using your Delicious.com username and password, you get this:


Unfortunately Yummy “hangs” saying “Starting refresh…” The next version, due out in a month or so, has a fix for this (it’ll report an error, allowing you to try the other mechanism).


But that doesn’t help you right now. So what to do?


Simple. Quit Yummy by pressing the Home button and relaunch. You’ll get back to the Welcome screen and you can pick the Delicious.com option this time.


One final note: why do I ask users to make the choice? The short answer is that there is no way to determine what type of account you have without trying to log in. And when you use a Yahoo! ID the process is very different to using a Delicious.com username so I can’t just try both and see what happens.


Categories
howto tutorial

Saved Searches

I should really have written this blog post back in February last year when this was a new feature but an email from a user who couldn’t find it reminded me that I never quite got around to it.

So, you’ve probably figured out the search screen. You can enter one or more keywords in the search box at the top of the screen and select what you’re searching on at the bottom of the screen (tags, title or notes).

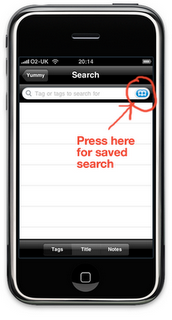
Perhaps not so obvious, or at least very subtle, is the fact that Yummy saves your searches. In fact, every search you make is automatically saved. But how do you get to those searches?

I used the “standard” bookmarks button but I’ll concede that it’s very small! Anyway, pressing that button leads to this screen.
Selecting the search term sends you to the search screen with that search all ready for viewing.
If you want to delete all the saved searches you can press the “Delete All” button. You can also remove individual searches by swiping it (left-to-right or vice versa) and then confirming by pressing the “Delete” button.
Categories
howto support tutorial

Bookmarking to Delicious from Twitterrific (Pt 2)

This is just a quick update to an old post about sending bookmarks from Twitterrific to Yummy. An update to Twitterrific seems to have slightly broken the mechanism.

If you followed that original advice you would probably find that the URL in Yummy would be prefixed by “url=”, which meant that you had to manually edit it to make it useful. The solution is easy:

Enter “yummy://post?” into the “Add Bookmark” field (without the quotes).

I have also gone back and updated the original post.

Categories
howto support

Error 999

Maybe it’s a case of having more users or maybe it’s Yahoo, the owners of the Delicious.com service, adjusting some parameter, but recently I’ve been seeing an increase in the number of people seeing “Error 999” when they start a refresh of their bookmarks in Yummy.

So what does it mean? What am I going to do to fix it? What can you do when you get it? And what can you do to prevent it? That’s what I hope to answer with this blog.

Status Code 999 is Yahoos “generic” error message. It typically means that you’ve been trying to refresh too frequently though there are a number of other causes.

Unfortunately, since the error comes straight from Yahoo, there is nothing I can do in Yummy to fix this, at least not directly.

I believe the number one cause of it is users not allowing Yummy to finish downloading all their bookmarks. This forces Yummy to download every bookmark every time you launch it, something that Yahoo tries to discourage. Once it has completed its initial download, Yummy will only ask for the bookmarks that have changed.

This makes the only significant preventative measure: if Yummy is refreshing its cache, don’t exit unless you really need to.

The next version of Yummy will make it harder to exit half way through the initial download of bookmarks. Details of this will be coming soon.

If you do get Error 999, the first thing to try is just waiting a while and trying again. This usually works. “A while” does vary. I would leave it an hour or two at the very least.

Another thing worth trying is switching to WiFi if you’re currently on your cell/mobile network or vice versa. The fact that you’re coming from a different internet address often makes a difference.

Categories
howto support

Yummy doesn’t save my password

In the past few weeks I have received a few emails and one review in the App Store saying some variation of “Yummy asks for my password every time I start it. How do I make it stop?”

In fact, Yummy, does save your password, but there are two cases where it will ask for the password anyway.

The first case is the most obvious: your Delicious.com password has changed. I’m guessing that this isn’t the case here, though.

The second case is where Yummy has not finished downloading all your bookmarks for the first time. The simple solution here is to let it download all your bookmarks before exiting. If you have a lot of bookmarks you might find that it’s quicker to use WiFi rather than the cell/mobile network. If you have thousands of bookmarks this may take a while, and the UI may become unresponsive for short periods of time. Once complete, if you look at the menu screen you should see the text “Last sync:” and then a time, which indicates the last activity on your Delicious.com account.

Note that this only refers to the first complete sync; after this Yummy should not ask for your password again. Incidentally, you can see how many bookmarks Yummy knows about in the About screen. And Delicious tells you on your home page:

If you’re sure that you’ve entered your password correctly and that Yummy has the full compliment of bookmarks and you’re still being asked for enter your password every time, please let me know.

Categories
howto support tutorial

Long Article Titles

One thing that has bothered me about Yummy for a while is the problem of very long article titles. Here’s what anonymous said about it on my UserVoice page:

Bookmark or article titles on the web can be very long… the current default size for bookmarks is too big, making it quite hard to read the full bookmark titles. I would suggest offering a font choice (see Wikiamo for a great implementation), or perhaps allowing bookmark titles to break on to a new line, in a smaller default font, and then create a gap between each bookmark block.

For those that are not familiar with it, Wikiamo has a slider control that allows you to vary the size of the text.

Some alternatives to Yummy “solve” the problem by allowing you to view your bookmarks in landscape mode. I put solve in quotes as it doesn’t really solve the problem. Sure, it allows longer titles but it doesn’t guarantee that you can see every long headline, a flaw it has in common with reducing the font size.

Instead of these partial solutions, Yummy automatically scrolls long titles (or tags if you have them). Clearly the screen would instantly become a jumble of moving text if done incorrectly. I spent a lot of time trying to get the balance right and I think it works pretty well. It defaults to waiting a couple of second and then starting scrolling. You can change the delay in the Settings application. Here’s a short video showing how it looks.

Categories
howto support tutorial

Instapaper Integration

Okay, so you’ve got Yummy, you’ve heard that the latest version allows you to post your bookmarks to Instapaper from Delicious for off-line reading but how do you do it?

  1. Quit Yummy
  2. Open the Settings application and select Yummy
  3. Enter your Instapaper username in the box at the top of the screen
  4. Back in Yummy you’ll now find the “Send to Instapaper” option in the “Action” button at the bottom of the bookmark and web preview screen. If you don’t have a password, then you’re done
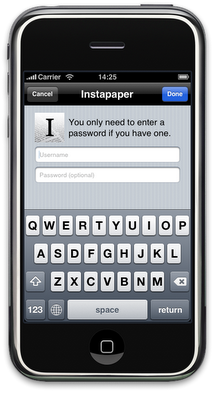
  5. If you do have a password press the button anyway. You’ll get the opportunity to enter your password using a screen that looks a lot like this:

    The screen will check your password before proceeding so you do need to be online for this to happen
  6. When you press done, you’ll need to select the “Send to Instapaper” button again to send your link to Instapaper

Easy, eh?